Integration with Keycloak#
This is a guide to configure Keycloak for piveau and vice versa. Keycloak + Piveau = ❤
Keycloak deployment:#
The following docker-compose can be used to deploy Keycloak locally:
services:
  postgresql:
    image: docker.io/bitnami/postgresql:11
    environment:
      # ALLOW_EMPTY_PASSWORD is recommended only for development.
      - ALLOW_EMPTY_PASSWORD=yes
      - POSTGRESQL_USERNAME=bn_keycloak
      - POSTGRESQL_DATABASE=bitnami_keycloak
    volumes:
      - 'postgresql_data:/bitnami/postgresql'

  keycloak:
    image: docker.io/bitnami/keycloak:20
    depends_on:
      - postgresql
    # Enable if keycloak should run under auth path
    # environment:
    #  - KC_HTTP_RELATIVE_PATH=/auth
    ports:
      - "8090:8080"

volumes:
  postgresql_data:
    driver: local
Bring up the network:
Basic configuration:#
There are two ways to configure a realm with the correct settings, either manually or by uploading a pre-configured realm. For new realms the pre-configured realm is recommended. If you want to modify an existing realm to work with piveau, you might want to go through the configuration manually.
Upload#
- You find the pre-configured Realm here.
- Go to your keycloak admin interface, e.g. http://localhost:8090/admin.
- Login with
useras username andbitnamias password - Click on Create Realm
- Upload piveau-realm.json or
- Paste the contents of the json into the Resource field
- Click on Create
Manual configuration#
- Go to: http://localhost:8090/admin
- Login with
useras username andbitnamias password - Create a realm piveau
- Go to Realm settings
- Go to Keys > Providers
- Delete the rsa-enc-generated provider
- Go to Realm role and create a role called operator
- Create a client with the name piveau-hub-ui
- Create client piveau-hub-repo
- Enable authentication and authorization for the client under Settings > Capability config
- Go to Authorization tab of piveau-hub-repo client
- Go to Settings tab
- Set Decision Strategy to Affirmative
- Go to Scopes tab
- Create scopes:
dataset:create,dataset:updateanddataset:delete - Create scopes:
catalogue:create,catalogue:updateandcatalogue:delete
- Create scopes:
- Go to Policies tab
- Create an operator policy
- Click on Create Policy
- Name it "Operator Policy"
- Add the operator role to the policy
- Create an operator policy
- Go to Permissions tab
- Create an operator permissions
- Click on Create scope-based permission
- Add all available scopes
- Add operator policy
- Create an operator permissions
- Go to Resource tab
- Delete Default Resource
- Create a resource Catalogue Resource
- Set display name to Catalogue Resource
- Add URI:
urn:piveau-hub-repo:resource:catalogue - Add all catalogue scopes
- Enable User-Managed access
- Go to Service accounts roles
- Click in Assign role
- Filter by clients
- Search for manage-users and assign
- Go to Advanced Tab
- Set refresh tokens ON
- Set Refresh tokens for client credentials grant ON
- Go to Settings tab
Further Configuration#
CORS Settings#
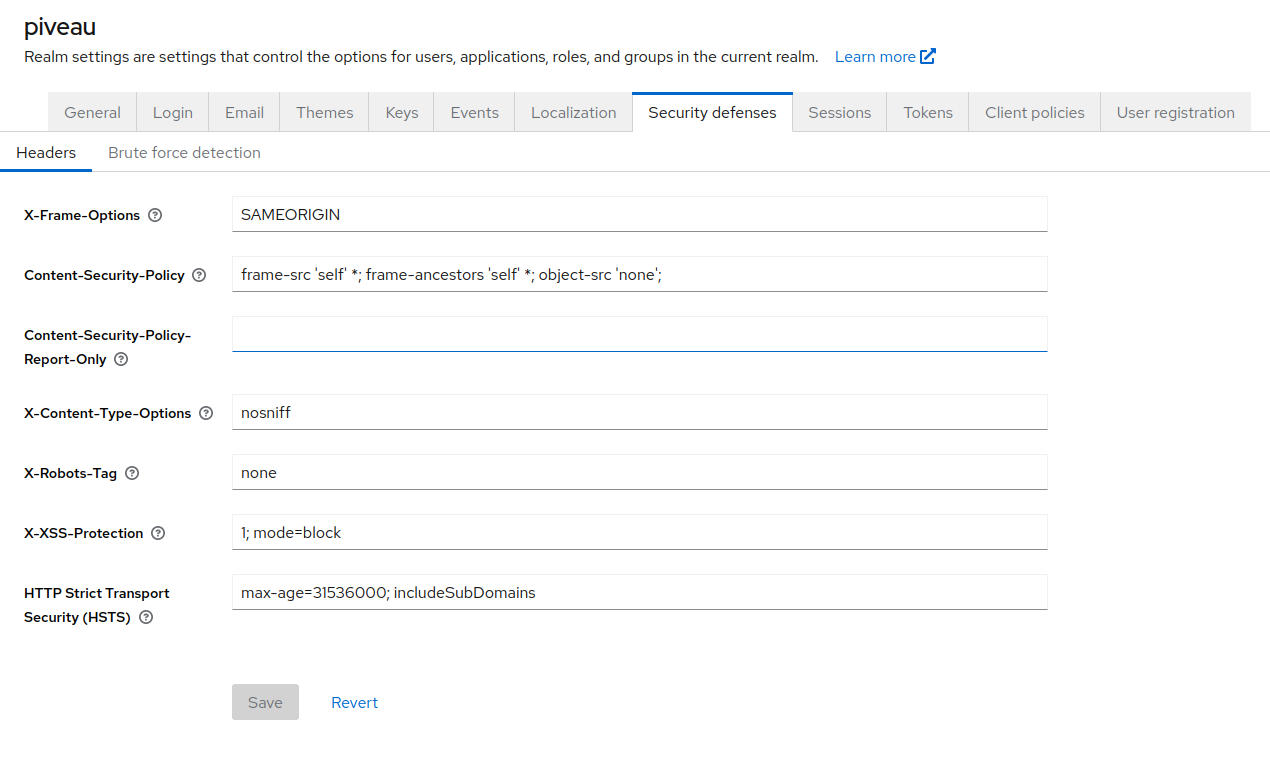
Please note that the realm settings should allow the CORS origins for your domain. Below there is an example that allow all origins.
However it is recommended to limit the origins by explicitely setting them like so:
Note
Note that X-Frame-Options is deprecated an being replaced by content-security-policy.
You can change the setting under Realm settings > Security defenses
Redirect URLs#
Depending on your setup you need to define valid URLs for the piveau-hub-ui client, so the communication between the frontend and keycloak can work. You set suitable URLs under Clients > piveau-hub-ui > Settings > Access settings
Service Configuration#
You need to configure hub-repo and hub-ui to work with Keycloak.
hub-repo Configuration#
Get the client secret of piveau-hub-repo client in the Credentials tab - e.g. "8GV8dzNc3tbDJgwVs9N3MvzuT3GWtu18"
Add the following to the config of hub-repo:
"PIVEAU_HUB_AUTHORIZATION_PROCESS_DATA": {
    "clientId": "piveau-hub-repo",
    "clientSecret": "8GV8dzNc3tbDJgwVs9N3MvzuT3GWtu18",
    "tokenServerConfig": {
      "keycloak": {
        "serverUrl": "http://localhost:8090",
        "realm": "piveau"
      }
    }
}
Additional fields that can be used and how they are used can be viewed in the hub repo reference or the hub repo readme.
Note
If keycloak is running under the path '/auth', append '/auth' to the 'serverUrl'.
Note
If the UI is running on a different domain than entered in the serverUrl field, the token issuer will differ from the one the hub-repo knows. You will then get authentication errors on protected requests to the hub-repo. In that case you can add the field issuer to the root of the PIVEAU_HUB_AUTHORIZATION_PROCESS_DATA object with the complete public URI to the realm as value, i.e. https://keycloak.example.com/realms/piveau. Find out more on stack overflow.
hub-ui Configuration#
Set the following configuration in your user-config.json:
authentication: {
  useService: true,
  login: {
    useLogin: true,

    loginTitle: 'Login',
    loginURL: '/login',
    loginRedirectUri: '/',

    logoutTitle: 'Logout',
    logoutURL: '/logout',
    logoutRedirectUri: '/',
  },
  keycloak: {
    realm: 'piveau',
    clientId: 'piveau-hub-ui',
    url: 'http://localhost:8090',
    'ssl-required': 'external',
    'public-client': true,
    'verify-token-audience': true,
    'use-resource-role-mappings': true,
    'confidential-port': 0,
  },
  keycloakInit: {
    pkceMethod: 'S256',
  },
  rtp: {
    grand_type: 'urn:ietf:params:oauth:grant-type:uma-ticket',
    audience: 'piveau-hub-repo',
  },
  authToken: '',
}
Note
You can set all these values via environment variables too. See runtime-config.js for further information.
Hands On#
You can now test everything. But first you need at least one catalogue in hub-repo. You can create one by following this guide or you synchronize existing catalogues with the shell of hub-repo.
Note
Go to: http://localhost:8085/shell.html. The CLI of hub-repo and enter: syncKeycloakGroups
You can check if that worked by checking in Keycloak under Clients > piveau-hub-repo > Authorization > Resources. You should see your catalogue there.
Create a User#
You can now create a user and assign to one or more catalogues.
- Go to Users
- Click Add user and create one
- After that click on the user
- Go to Credentials and set a password
- Go to Groups to add the user to a catalogue
- Click on Join Group for this
- You can make the user an operator aka admin by assigning them to operator role under Role Mapping
Create a Test Dataset#
- Go to: http://localhost:8090/admin.
- Go to groups. Existing groups should be added now.
- Assign the user to a group.
Get a user token:
curl --location 'localhost:8090/realms/piveau/protocol/openid-connect/token' \
--header 'Content-Type: application/x-www-form-urlencoded' \
--data-urlencode 'username=alice' \
--data-urlencode 'password=123456' \
--data-urlencode 'grant_type=password' \
--data-urlencode 'client_id=piveau-hub-ui'
Get a request party token, use the user token as bearer:
curl --location 'localhost:8090/realms/piveau/protocol/openid-connect/token' \
--header 'Authorization: Bearer eyJhbGciOiJSUzI1NiIsInR5cCIgOiAiSldUIiwia2lkIiA6ICJnbFM1Q0w0T1RQSEQ5MDVLZGExbk4zSmZndlRYbTY4bk4yOHoyWmJIaVBjIn0.eyJleHAiOjE2Nzk1NzkzODQsImlhdCI6MTY3OTU3OTA4NCwianRpIjoiYzBiZjA3NWMtMjRmMS00YTNmLTk2MTItMDllMzk0NmI0ZTA5IiwiaXNzIjoiaHR0cDovL2xvY2FsaG9zdDo4MDkwL2F1dGgvcmVhbG1zL3BpdmVhdSIsImF1ZCI6ImFjY291bnQiLCJzdWIiOiIzY2YwMDU5Yy0zYTI5LTQxMDUtOTBmZC03NjhlOGM3NzA1ZmQiLCJ0eXAiOiJCZWFyZXIiLCJhenAiOiJwaXZlYXUtaHViLXVpIiwic2Vzc2lvbl9zdGF0ZSI6IjdhYjFhMjkwLTFjZTEtNDdmYy1hY2YyLWQ3NWExM2RlYjJlZCIsImFjciI6IjEiLCJyZWFsbV9hY2Nlc3MiOnsicm9sZXMiOlsiZGVmYXVsdC1yb2xlcy1waXZlYXUiLCJvZmZsaW5lX2FjY2VzcyIsInVtYV9hdXRob3JpemF0aW9uIl19LCJyZXNvdXJjZV9hY2Nlc3MiOnsiYWNjb3VudCI6eyJyb2xlcyI6WyJtYW5hZ2UtYWNjb3VudCIsIm1hbmFnZS1hY2NvdW50LWxpbmtzIiwidmlldy1wcm9maWxlIl19fSwic2NvcGUiOiJwcm9maWxlIGVtYWlsIiwic2lkIjoiN2FiMWEyOTAtMWNlMS00N2ZjLWFjZjItZDc1YTEzZGViMmVkIiwiZW1haWxfdmVyaWZpZWQiOmZhbHNlLCJwcmVmZXJyZWRfdXNlcm5hbWUiOiJhbGljZSIsImdpdmVuX25hbWUiOiIiLCJmYW1pbHlfbmFtZSI6IiJ9.Rg5twPIiB\_\_4cBcFpcbBUk9LR7n6AGptQedlH4fuxx1haGsUucE7gkkRGwzO4MwGdSvK-PYTiRgVW86TkgBn3sTNjN9EadVZVaJBwu3JJU6CYpuvev3fJ4WcigejkPZccJ57xZyeICqvTSi6OlWFuQDGhZNJByXjnn6lW-phJmhyF2USAKyijiBEV0jKZ\_VYSdcek5pyfR3FyyrKPD9TpBNtMwQWB5N8NI7LG25oq4UMUYWZNy_OL3TyWUmkRh13guKa3P0iSdyJMax7sAh3StgoGrtDrcWlRJqJpjRujxlrRObFGPIzgj-sb8RQYtpKhmuyv9gn5TK9oP4Zfx54EQ' \
--header 'Content-Type: application/x-www-form-urlencoded' \
--data-urlencode 'grant_type=urn:ietf:params:oauth:grant-type:uma-ticket' \
--data-urlencode 'audience=piveau-hub-repo'
Add a new dataset to hub-repo, use the request party token as bearer:
curl --location --request PUT 'http://localhost:8080/catalogues/catalog/datasets/origin?originalId=auth-test' \
--header 'Authorization: Bearer eyJhbGciOiJSUzI1NiIsInR5cCIgOiAiSldUIiwia2lkIiA6ICJnbFM1Q0w0T1RQSEQ5MDVLZGExbk4zSmZndlRYbTY4bk4yOHoyWmJIaVBjIn0.eyJleHAiOjE2Nzk1Nzk4MTMsImlhdCI6MTY3OTU3OTUxMywianRpIjoiNDhhMWQ3NjMtYzY3NS00NWMxLThjMGItZmYyYjUzOWZkMWFmIiwiaXNzIjoiaHR0cDovL2xvY2FsaG9zdDo4MDkwL2F1dGgvcmVhbG1zL3BpdmVhdSIsImF1ZCI6InBpdmVhdS1odWItcmVwbyIsInN1YiI6IjNjZjAwNTljLTNhMjktNDEwNS05MGZkLTc2OGU4Yzc3MDVmZCIsInR5cCI6IkJlYXJlciIsImF6cCI6InBpdmVhdS1odWItdWkiLCJzZXNzaW9uX3N0YXRlIjoiMGU4ZDA4NWEtOTdlYy00ZTcwLWE2NmItYjMxZTMxODZhN2Q4IiwiYWNyIjoiMSIsInJlYWxtX2FjY2VzcyI6eyJyb2xlcyI6WyJkZWZhdWx0LXJvbGVzLXBpdmVhdSIsIm9mZmxpbmVfYWNjZXNzIiwidW1hX2F1dGhvcml6YXRpb24iXX0sInJlc291cmNlX2FjY2VzcyI6eyJhY2NvdW50Ijp7InJvbGVzIjpbIm1hbmFnZS1hY2NvdW50IiwibWFuYWdlLWFjY291bnQtbGlua3MiLCJ2aWV3LXByb2ZpbGUiXX19LCJhdXRob3JpemF0aW9uIjp7InBlcm1pc3Npb25zIjpbeyJzY29wZXMiOlsiZGF0YXNldDp1cGRhdGUiLCJkYXRhc2V0OmRlbGV0ZSIsImRhdGFzZXQ6Y3JlYXRlIl0sInJzaWQiOiI0YjE3YzNkZC1iZmY2LTRhNzEtODRiMy1kZmQ0NjIxYzQwMjYiLCJyc25hbWUiOiJjYXRhbG9nIn1dfSwic2NvcGUiOiJwcm9maWxlIGVtYWlsIiwic2lkIjoiMGU4ZDA4NWEtOTdlYy00ZTcwLWE2NmItYjMxZTMxODZhN2Q4IiwiZW1haWxfdmVyaWZpZWQiOmZhbHNlLCJwcmVmZXJyZWRfdXNlcm5hbWUiOiJhbGljZSIsImdpdmVuX25hbWUiOiIiLCJmYW1pbHlfbmFtZSI6IiJ9.jBaPa4LY9U3cFqAZnjDoJk9F-W6rn9TK6VfHZIdrtHuZTresXV69EoOlUXyvPK\_S3LUXa5\_FBsbtaygHz3kyvnnPIBIalEmIQ1bC4TrutLS2ZJvzUNkF4RLJrBc-T7sElCxaBdL8SPflZOhFZYKgEkTf8pEe\_\_AtgCJWIvQ\_WgAys-s1XX8E5PoCpkd6gt\_F-DPXlAJO-m6NvKad0Sgv\_UbaUoIOujy8BDxH3G2XLPTfrWSbdHsRdYv-7wj-N5dy2Krxrbwo1fpiH5U7Bpq-n5-OWGhNbQreeZKv4npZaG\_1WeizPE6iX26pm\_ZXSWSeDnKn4\_iub-GwK8SY\_EhHew' \
--header 'Content-Type: text/turtle' \
--data-raw '@prefix dcat:     <http://www.w3.org/ns/dcat#> .
@prefix dct:      <http://purl.org/dc/terms/> .
@prefix rdf:      <http://www.w3.org/1999/02/22-rdf-syntax-ns#> .

<http://data.europa.eu/88u/dataset/auth-test>
    dct:description "Auth testing"@en ;
    dct:title "Auth testing"@en ;
    rdf:type dcat:Dataset .'